
How to Deep Condition Fine Natural Hair: The Complete A–Z Guide

If you had a nickel for every time you washed your hair only to discover days later it was still feeling dry as the Sahara, would you be rich? OK, not rich, but could you at least go buy a new article of clothing? Hmph. It’s time to stop that madness. Let’s get rich some other way – starting with using a deep conditioning treatment for your natural hair on a regular.
Why Deep Condition Curly Hair?
Deep conditioning is one of the most important parts of your natural hair regimen, if not the most important. That’s why I put together this complete guide for deep conditioning fine natural hair.
Here’s the thing: those of us with natural hair have the driest hair on the planet. It’s just the structure of our hair. All those twists and turns that make up the hair shaft don’t allow sebum, our God-given natural moisturizer, to travel freely from the top of our strands to the bottom.
When you give your curls adequate moisture via deep conditioning regularly, you help increase your rate of hair growth. You also reduce the instances of split ends while combating frizz.
This is even more necessary if you use heat styling tools like a curling iron or flat iron. These heat stylers will suck moisture right out of your curls and turn your once beautiful hair into lackluster, brittle hair if you neglect deep conditioning.

Deep Conditioner vs. Protein Treatment (they are NOT the same)

Before we go further, one important distinction, because people mix these up all the time.
A deep conditioner has one true purpose: to restore a healthy moisture balance back to your hair. It reverses the state of dry hair. Deep conditioners often contain other nutrients to feed the hair shaft, and some even contain a fair amount of protein, but the ultimate goal is moisture.
A protein conditioner or protein treatment serves to fill in the gaps along a frayed strand while strengthening the hair. This is extra beneficial for fine natural hair, which is vulnerable to breakage because of the small circumference of the strands.
Both are beneficial, and one is no more important than the other. They just do different jobs. And if you ever find your hair is lacking elasticity, you may need to balance it out by deep conditioning with a product that does not contain protein.
Not convinced deep conditioning is even worth it?
Read this first: Deep Conditioning is Not a Scam.
A Word on Deep Conditioning Curly and Kinky Hair
All hair types need deep conditioning at some point — but for kinky, curly, and coily textures it’s non-negotiable, because the tighter the curl pattern, the harder it is for your scalp’s natural oils to make it down the strand.
Two things matter most for curly and kinky hair specifically:
- Sectioning and slip. The more textured your hair, the more conditioner you need for both coverage and slip so the product moves through your coils without snagging and snapping.
- Heat. Textured hair benefits enormously from a heat source because it helps the conditioner penetrate hair that’s naturally more resistant to moisture.
If you have fine and curly hair, look for a conditioner with amino acids. They help strengthen the hair without being a full protein treatment.
Deep Conditioning Low Porosity Hair
Low porosity (low-po) hair has tight cuticles, making it difficult to receive moisture into the hair shaft. Conversely, low-po hair holds onto moisture quite well.
The key is getting moisture into the hair. This is where proper deep conditioning comes into play – applying a heat source under a plastic cap.
Deep Conditioning High Porosity Hair
High porosity hair is just the opposite. The cuticles are raised, and while moisture is easily imparted, it’s also easily lost.
Deep conditioning is done in a similar manner as low-po hair, but high-po hair needs extra effort to close the cuticle once done. More on this below.
How to Deep Condition Your Hair, Step by Step
Here’s my no-shortcuts method for a stress-free, effective deep conditioning session. Everything is done in sections, so keep that in the back of your mind.
1. Start on freshly washed, detangled, softened hair. I like to detangle right after my wash. A pre-poo (left in for at least 30 minutes, sometimes overnight) helps soften your hair first. If you add deep conditioner to hair that isn’t detangled, you’ll end up with more tangles than you started with, and unnecessary breakage, which fine hair can’t afford. Work on damp hair, not sopping wet, or you’ll dilute the product.
2. Use a deep conditioner with real slip. This is the big one. A mediocre conditioner won’t give you the results you want. Slip is what lets you glide the product through your hair and distribute it evenly without breakage. Focus on moisture here; choose a conditioner rich in moisturizing ingredients with little to no protein, so you’re deep conditioning purely for moisture. (Save strengthening for a separate protein treatment.)
3. If your conditioner is short on slip, add a little oil. Found a conditioner you love that’s just a touch stiff? Add a tablespoon or two of a lightweight natural oil (jojoba, argan, olive, almond) right into the product. Instant slip. You can also add an herbal powder like marshmallow root.
4. Apply in sections, root to tip, then work upward. Go section by section for full coverage, distributing from root to tip. Fingers are better than a comb, but a wide-tooth comb works if you need it. Then make a pass working upward from your ends toward your scalp so every strand is coated.
5. Cover with a plastic cap and add a real heat source. Body heat alone isn’t enough to open the cuticle. In order to deep condition thoroughly, you need to apply heat to the entirety of your hair strands (root to tip). That pretty much nixes the idea of just wearing a non-heated cap that only causes you to generate heat at the scalp.
Put on a plastic cap (an actual plastic cap — not a plastic shopping or garbage bag; the softer plastic of a real cap generates heat far better), then apply heat: a microwaveable heating cap like the Hot Head, a plug-in heating cap, a soft bonnet, or a dome dryer. The heat swells the cuticle open so your hair can actually drink in the moisture.
Alternatively, you can use a hair steamer. In this case, you don’t need the plastic cap.
This will give you the best results from your deep conditioning treatment. Especially if you have low porosity hair.
This may seem counterintuitive for high porosity hair, but it works the same. What differs slightly is when it comes time to wash out the deep conditioner.
6. Sit for about 30 minutes. Thirty minutes under heat is the sweet spot. Less than that isn’t as effective; more than an hour gives you no extra benefit. No need to hover. Pop on a cute hat and go multitask, run errands, or fold some laundry.
7. Rinse with cool water. Cool water seals the cuticle back down, which locks in the moisture and cuts down on frizz. Don’t rush the process. Your hair is going to be in such a better state afterward. To complete your deep conditioning session, it’s recommended that your final rinse be done with cold water (regardless of porosity – see the section on porosity above).
This will seal in all the goodness you just imparted to your hair by deep conditioning it.
If you’re like me, cold water is not about to happen. Tepid or cool water works just fine. You can also do a cool ACV (apple cider vinegar) or AVJ (aloe vera juice) rinse.
Once a month tip: swap in a deep conditioner that contains a bit of protein balanced with moisture. That way you get strength and moisture together without throwing off your balance.
How long should you deep condition your hair?

There’s not only some confusion surrounding how you should deep condition curly hair but also about how long.
Some say you need to sit with a plastic cap on under a dryer or heated cap that generates heat.
Others say you can just sit with a cap and let your head generate the heat. “30 minutes is optimal.” No. “3 hours…..Overnight.” Wait. Hold your horses.
Since the purpose of deep conditioning is to nourish, soften, and impart deep moisture to the hair, the conditioner must go deep. For that to happen, you need a little time. Wouldn’t you agree? So, how much time?
Enough time for your hair shaft to swell open and receive the product that’s being used to deep condition it.
That, my dear Watson, does not take 3 hours or an entire evening. As a matter of fact, when you deep condition your hair for such a long period of time, you are over-moisturizing it and putting it at risk for becoming “mush.”
I like to call it the no bounce-back factor. It’s just limp, blah, and now needs some protein to bring it back to life.
Depending on your hair’s condition and porosity level, you can adequately deep condition in 15-60 minutes. Anything longer isn’t even beneficial.
How Often Should You Deep Condition?
The rule of thumb is after every wash. Depending on how dry your hair is, you may find you need to wash, and therefore deep condition more often.
Think of deep conditioning as a standing part of wash day, not an occasional treat.

The A–Z of deep conditioning
I’ve compiled everything you need to know into an A–Z. There isn’t a tip for every letter (there’s one for almost every letter – all but two), but this is your complete reference for the details behind the method above. Let’s get to it.
Application. Apply on damp hair, not sopping wet, or you’ll dilute the conditioner. Take your time so you don’t cause unnecessary breakage, especially with fine hair.
Balance. Deep conditioning balances out hair that has too much protein. You always want a good moisture-to-protein proportion so your hair doesn’t lose elasticity.
Caps. You need a plastic cap or shower cap plus a deep conditioning cap: a microwaveable Hot Head or a plug-in cap. The plastic cap goes on underneath. Please don’t use a plastic bag; real plastic caps are affordable and work much better. No heating cap? A handheld blow dryer or a dome dryer you sit under will do.
Detangle. Always apply deep conditioner to detangled hair. Add product to tangled hair, and you’ll end up with mats — exactly what you don’t want.
Elasticity. Adding a couple of essential oils (like peppermint or rosemary) to your deep conditioner is optional but beneficial — they can add a growth-stimulating effect. Just research which oils suit your hair first.
Frizz & Fibers. Your hair is made of fibers, so a good deep conditioner eliminates frizz by coating and smoothing those fibers for shinier, frizz-free hair. (Another “F” — Frequency — is covered in “How often” above.)
Gloss. A great complement to your deep conditioner is an herb like henna or cassia, which turns it into a henna or cassia gloss. A gloss adds shine and strength, makes hair silkier, and smooths frizz.
Heat. Heat is what makes deep conditioning work. Applied over a cap, it swells the cuticle open so your hair can receive the moisture and all the goodness the conditioner has to offer.
Ingredients. Ingredients matter: not all deep conditioners are created equal. You want water, some kind of oil, and a humectant among the first few ingredients. If you have fine hair, a conditioner with amino acids helps strengthen it (this is not the same as a full protein treatment).
Jars. Making your own? Use the right jars; dark-colored amber jars protect the integrity of a DIY conditioner far longer than clear ones.
Keratin. Keratin forms the outer layer of your hair, and it’s a protein. If you want to deep condition only for moisture, avoid it. But if you do keratin treatments for strength, always follow with a deep conditioner to balance out all that strength.
Lubricate. Remember how sebum struggles to move down the shaft of curly hair? That’s a lack of lubrication. Your deep conditioner lubricates where your sebum can’t.
Moisture. A good deep conditioner primes your hair to hold moisture for days beyond wash day. Hydrating your hair internally is its whole job.
Nourishing. The ingredients should be nourishing — promoting hair growth, good health, and good condition.
Oils. Coconut oil makes a great pre-wash treatment. Adding natural oils like castor oil, or carrier oils like sweet almond, to your conditioner boosts moisture and slip; essential oils like peppermint and rosemary can add a growth-stimulating effect by strengthening the cuticle. Here are essential oils worth adding to your regimen.
pH. Washing raises your hair’s pH. A conditioner has a lower pH than shampoo, so it returns your hair to normal by helping close the cuticle — which also helps damaged hair recover.
Restore. A good deep conditioner restores your moisture balance: dull hair revived, brittle hair transformed. This is why you want water as the first or second ingredient.
Slip. One of the biggest deals in deep conditioning. If your product doesn’t have enough slip, add some with a natural oil (olive, almond) or an herbal powder like marshmallow root.
Shine, Smoothness, Seal (bonus “S” words). Deep conditioner adds shine and smoothness; rinsing with cool water seals moisture into the cuticle.
Time. Take your time — 30 minutes under a heating cap, no more than an hour. (Full detail in “How long” above.)
Upwards. Apply working upward: start at the ends and move toward the scalp for full coverage. (Another “U”: Ultimate. Plenty of conditioners put “Ultimate” in the title and fall short — see my real favorites below.)
Vitamins. Look for vitamins in your conditioner — at minimum vitamin B or Panthenol, which condition and soften the hair.
Water. Water carries all the goodness in your conditioner and should be number one on the ingredient list. Make sure your hair has a good bit of water in it (not saturated) when you apply.
Zone. OK, this one isn’t strictly deep-conditioning specific, but I couldn’t end an A–Z on the letter W! When I say “zone,” I mean get in the zone. Enjoy the process, don’t rush it, and let your hair soak up the good. Welcome to the Deep Conditioning Zone. 🙂

What’s The Best Deep Conditioner to Use?
With so many products on the market, it can be confusing to pick out a good deep conditioner because there are many.
Keep these in mind to help guide your purchasing decision:
- Does the conditioner contain natural oils like olive oil, jojoba oil, coconut or babassu oil?
- Can you pronounce most of the ingredients?
- Does the conditioner contain essential fatty acids like lauric, linoleic, or stearic?
- Does it contain amino acids (proteins which you may not want for the intended treatment)
- Are there humectants in the conditioner? (honey, glycerin, etc)
These are all important things to make note of to choose the right product for your hair.
Best Deep Conditioners for Fine Natural Hair (IMO)
These deep conditioners are the best. Yes, there are plenty of other good ones, but the reason I prefer these particular deep conditioning products is due to how well they absorb into the hair strands without causing buildup while also allowing your hair to retain moisture for days afterward.
The fact that these also have great slip is a bonus.


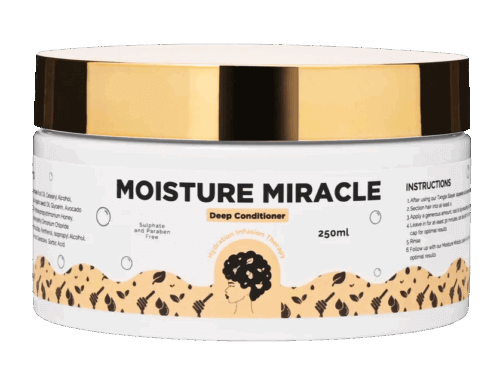
Tip: If your preferred deep conditioner doesn’t have enough slip, try adding a teaspoon of your favorite lightweight natural oil (ex: jojoba, argan).
Making Your Own Deep Conditioning Treatment

If you’re more of a DIY gal (or guy) looking to save a few coins, below are a couple of easy DIY deep conditioning treatment recipes for natural hair you can try:
Banana Deep Conditioning Mask
- 1 Overripe Banana or jar of Banana Baby Food
- 4 tablespoons Extra Virgin Olive Oil or Almond Oil
- 4 tablespoons of Organic Unrefined Coconut Oil
- 2 tablespoons of Organic Honey
Avocado Deep Conditioner
- 1 Overripe Avocado
- 1/4 cup Extra Virgin Olive Oil or Avocado Oil
- 1/2 cup unrefined shea butter, cocoa butter, or mango butter
- 2-3 tablespoons of Apple Cider Vinegar
There’s no need to melt or heat any of the ingredients. Simply blend to your desired consistency. I like to use this Ninja food processor:


Once done, apply and don’t forget to use heat!
When making your own deep conditioning hair mask, it’s a good idea to add natural ingredients that complement each other. This can include essential oils and other natural oils like castor oil or Argan oil. These kinds of oils are known for promoting moisture retention within the hair shaft.
My Personal Experiences with Deep Conditioning
Side bar: While I have low porosity hair, I still rinse with cool water. Here’s why…
Although low porosity hair has tightly closed cuticles, when you wash it with warm/hot water, the cuticles raise. Before you dry your hair, you want the cuticles to close back after your hair dries.
Some ladies with low-po hair will seal the hair with oil and then do a quick cool water rinse afterwards. This works well, but I’ve found my hair stays equally moisturized by rinsing with cool water before sealing with the lightweight oil.
The Curly Girl Method and Deep Conditioning
If you follow the curly girl method or would like to, there is something you should know about deep conditioning.
It’s basically non-existent.
At least, I don’t recall anything about deep conditioning in the Curly Girl Handbook.
Following this method to care for your curly hair, you don’t even use a deep conditioning product, just a normal conditioner. You certainly don’t apply any heat while using a deep conditioning treatment for natural hair.
In fact, all you use is a regular conditioner to “wash” and you just leave some of it in your wet hair afterward.
It’s sort of like putting a leave-in conditioner in your hair and skipping deep conditioning altogether.
This method is supposed to promote extra moisture in your hair. The founder of this method, Lorraine Massey, fosters the belief that all curl types can benefit from this method of hair care.
I tried the Curly Girl Method for several months. While I do see some benefits, in my opinion, the lack of adequate conditioning is just not sufficient for those with a more coily hair type.
You can read more about The Curly Girl Method here:

Deep Conditioning Do’s and Don’ts
For a little more perspective, here are two outside reads on what to do and what to avoid if you want more insight on how to deep condition natural hair:
- The Do’s and Don’ts of Deep Conditioning (NaturallyCurly)
- Ouidad’s Deep Conditioning Do’s and Don’ts
Deep Conditioning in The Winter
Deep conditioning changes with the seasons, too. Here’s how to adjust your deep conditioning for winter. And if you ever doubt whether it’s worth the effort, here’s the case for why it absolutely is: Deep Conditioning is Not a Scam.
Quick Points to Remember:
- Deep condition every wash day (at least weekly)
- Use a deep conditioner product sans-protein
- Use a heat source over a plastic cap
- 15-60 minutes is sufficient
- Rinse with cool or tepid water to close your hair’s cuticle.
- Rinse with an Apple Cider Vinegar rinse if you have high porosity hair
- Use Aloe Vera juice as a final rinse in place of cool water
- No over-manipulating or detangling while deep conditioning
The goal of a good deep conditioning session is to protect your tresses from hair breakage by giving it the deep moisture needed to make your curls pliable.
Do it every wash day with products that contain the right ingredients or a DIY recipe of your own. Just please do it.
But I talk about that here: Why Fine Hair Needs Protein
Here are the previous articles on how to have an effective wash day:
Why & How to Pre-Poo Fine Natural Hair | Cleansing Fine Natural Hair for Length Retention

Some of the links in this article are affiliate links. So, should you purchase any of the items, I will receive a small commission. Thank you in advance for trusting my advice.





I love that you not only share the how to, but you also give a list of products! Thank you for your posts and helping me find a one stop place to do my research, that you did for me and shared! I know you do not bleach but if you ever need more to do I would love your advice on the best weekly and longer care to keep hair in good shape. I too have very fine hair very straight and fine hair. Good job the best I have found thank you again
Brandy Robnett
Hi Brandy, thank you so much for your kind words. Are you asking for advice on maintaining long hair that’s been bleached? I wasn’t sure I understood.
I would like to receive your newsletter
Hi Gail- You can sign up for it at http://eepurl.com/bPyBtf
This is the third time I try your DIY Banana deep conditioner,and I just love it!♡ it makes my curl pattern pop! mkaes my edges softer ! I can almost- alllllmost – say I have baby hair! Hhhh!
**bonus tip: I sifted the blend so nothing sticks to hair after rinse.
I love it .
xoxo♡
lad it’s working for you but banana? I don’t use banana in my hair 🙂
Hi!
Thanks for your great advice. However, on checking out the ingredients of the Shea Butter Honey & Manuka deep conditioner on their site I saw it contains hydrolized rice protein.
Right. I said your DC shouldn’t contain protein. I’ll make a notation next to the product because I find it doesn’t bother my hair at all. It’s a great deep conditioner. If you are looking to deep condition without protein, then obviously don’t use it. I should have elaborated that I will often protein treat and deep condition in one step because fine hair so desperately needs a regular dose of protein. I never have issues with this deep conditioner making my hair hard either.
Also, note the first 7 ingredients of a product is what’s in the product in abundance. Rice protein is 11th on the list meaning there’s not much of it.